 Low vision reading assistant.
Low vision reading assistant.
Low vision reading assistant.
Thad here. This section will be a little more chatty than normal so that I can provide more of a sense of how these devices can be made. Notes from my grandmother (my user) will be labelled "Ruth:." If someone out there actually makes one of these and feels motivated, send wearable-web@media.mit.edu mail with a better set of directions and your observations. The system below should be very inexpensive to make with a little sweat and innovation.
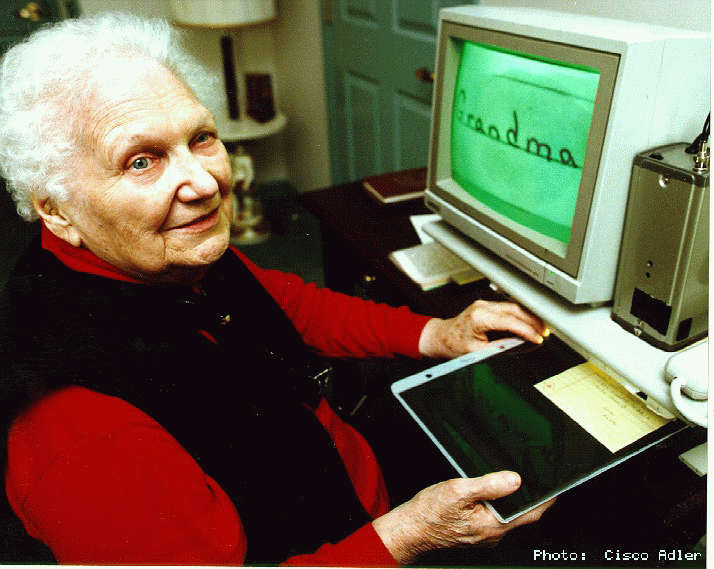
Soon after Steve and I put together a version of the Visual Filter that could theoretically help the visually disabled through remote enhancement of images, my grandmother (Ruth) became legally blind (20/300 one eye, fingers at 12 inches in the other). Unfortunately, she is not local to the Boston area so we could not try our high end aid. Out of curiousity, I tried rendering large fonts on my (personal) wearable computer to see if she could read the screen. Turns out she could but with difficulty. However, the Private Eye that I use renders in red, and my grandmother's condition left her with little ability to see red. To continue the experiment, I found a camcorder and a television set. By focusing the camera on newspaper print and having my grandmother sit close to the television, she could read. Focusing on pictures or on other people's faces allowed her to identify people. Since the image size was not larger than the faces themselves, I hypothesized that the contrast and brightness helped in recognition. This is supported by the Johns Hopkins work pointed to on the main page. Armed with this knowledge, I started to make a permanent system.
Unfortunately, the only head mount system that is light enough for everyday use by my grandmother is the Private Eye, and her condition was such that this was not useful. Therefore, I concentrated on making a "reading station" for her to use. The system consists of 4 main components: a black and white video camera with a 8.5mm or smaller focal length lens depending on the user ($50-$300), a monitor or black and white TV ($100), fluorescent lights (~$20), and a good computer/printer stand (~$20). Note that most of these parts can be found around the house or at second hand stores. Old store security cameras are a good bet.
Drill a hole in the printer stand to accomodate the camera lens. Make sure that the camera is on the right for a right-handed person or on the left for a left-handed person. Bevel the area around the hole to allow the camera to stay in place pointing straight down without bolting. This allows the user to pull out the camera at any time if necessary to see something that will not fit under the stand (though I would suggest a separate camera for this). Attach the lights around the lens on the bottom of the printer stand. Try to arrange it so that the camera lens recedes from the lights slightly. In this way, the user can press whatever he is reading against the lights without actually touching the lens (and blocking out the light). The best situation is when a book, pressed against the lights, is in focus. The lights are used to get good depth of field so that the user does not have to be as precise in how he holds his reading material. Put the monitor/tv on the stand. Hook everything up and see if the camera can focus on the reading material (many lenses will not focus this close). Note that when using the lights the camera lens will have to be on a small aperature (iris). If everything works, get a power strip with a large button or rocker switch, plug everything into this strip, fasten down all the loose cables, and have the user try out the system for refinements.
Having everything on one power switch is very important for the visually impaired. It makes the system easy to use at a moment's notice. Remember that the user will not be able to see which way the text is facing or even if it is lined up correctly without using the system. Sit down with the user for a day, make them use it independently, and see what improvements are necessary. I'll post some of the niceties that were necessary to make the system useful for my grandmother at some point when I'm not so tired (see below). Maybe I should just get her on the net to answer questions about the system! Basically, by working together, we were able to make a system that she could use with either eye. This is encouraging news for those with extremely poor vision (counting fingers at 12").
Note that many black and white video cameras do not put out a signal that a cheap B&W TV can use. However, many newer TV's have a "composite" input in back that the camera can be plugged into once you get the right adapter (try Radio Shack). There are converters from "composite" to the "rf" signal of the older TV's, but I don't know who sells them off hand (again, try Radio Shack). Many VCR's have "composite" in and can be hooked up to a normal TV. An expensive converter, but good for an initial experiment.
If buying a system from scratch, take the component parts with you and try each new piece as you get it. For example, when shopping for a new lens for this system (to get a larger field of view), I brought along the camera and insisted that the salesman let me try the lens. Most lens for these cheaper types of security cameras are "C mount" also known, I believe, as "mini universal mounts." The terminology is a little bit different between fields, so you have to be careful. Be particularly careful that the camera and the TV you buy can be hooked together and that the lens you buy works with the camera, has an iris, and can focus at tight distances. These are the major stumbling blocks. Print out the above image and this text and take it with you when shopping. Most of the appropriate video sales people should get the idea pretty quickly. If not, find another store. The cheap version of this equipment (as in not a $800 camcorder) will be off the beaten path. The higher contrast and more bright the monitor, the better. In my grandmother's case, a green monitor worked best (though this does not seem typical).
First, a simple box of the right height can be placed under the camera so that single page letters can be held in focus without the user tiring his hand. Furthermore, if the box can be aligned easily, simple white letters on the box spelling "ON" allow the user to immediately see whether the system is on or off. The box should be removeable so that books can be placed under the camera.
Make sure the table and chair are the right height so that the user can hold books under the system for extended periods of time without arm fatigue.
Single sheets of paper and newspapers easily fold and crumple causing the system to lose focus. A simple photo album page can be used to keep this from happening. Place a black piece of cardboard in the album page to improve contrast. Put identifying marks at the top left hand corner and bottom right corner of the cardboard for reference when the user is looking at it under the camera. Put a white tab between the sections of plastic, attached to the front portion, so that the user can simply feel where to place the letter or photo.
For inspiration, wander through a hardware store and a arts supply store. Often something will fall into your lap that will make the system much easier to use.
Just like when using a microscope, it is easy to lose your place when using this system. Thus, a holding tray, something like what is on a microfiche, would be appropriate. By lining up the piece of paper on the tray, the user could then move precisely horizontally or vertically. In fact, redesigning a microfiche for this purpose may be appropriate.
Use a longer focal distance. I haven't tried this, but it may be possible to use a longer focal distance so that the user can also use the system to watch himself write. Currently, my grandmother writes me letters by blindly writing and then proofing under the reader. More to come as I get feedback :-)......Speaking of feedback, everything that my grandmother suggests will be labelled "Ruth:" Up to now, most of this is what we had worked out together over Thanksgiving/Christmas.
Ruth: Maybe two cameras and two monitors to get a larger horizontal field of view and better orientating around the page?
Ruth: Right eye was from trauma to the kidney (20/300). Laser treatments didn't help. Left eye was from "Giant Cell Arteritis" (fingers at 12"). Interested in perfecting/selling the system.